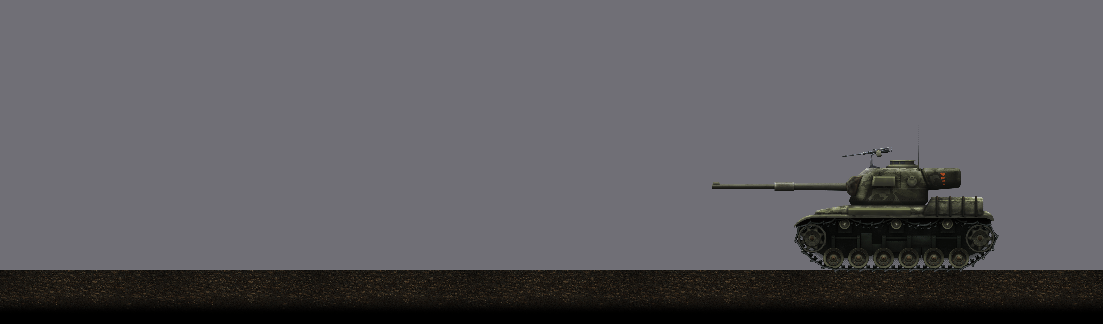
Tank
The tank project shows how mechanical components, like tank treads and wheels, can be easily and quickly animated using path and transform constraints. The tank example also uses Spine's tint black feature to create a large but inexpensive explosion effect.
Tank treads
Setup
The tank-root bone contains a slot treads-path which contains a path attachment of the same name. This path attachment is the target for the treads-path path constraint.
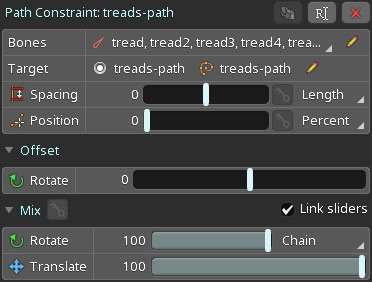
The path constraint drives the bones tread to tread36. This setup allows us to move the treads along the path during the animation process by only keying the Position value of the path constraint.
We used the defaults for all path constraint properties, except for Mix: Rotate is set to Chain instead of Tangent to ensure the tread bones rotate correctly along the path.
The path itself is weighted to a number bones, which can be seen in the Weights view when the the treads path is selected.
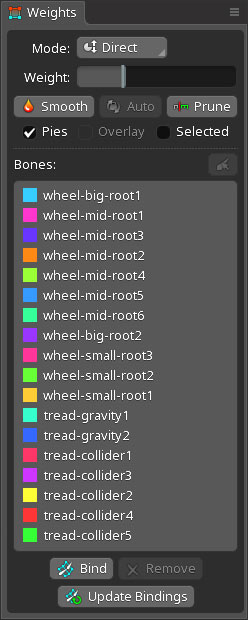
Any of these bones can be transformed to deform the path. In the GIF below, the tread-gravity1 bone is moved on the Y axis, deforming the path accordingly.
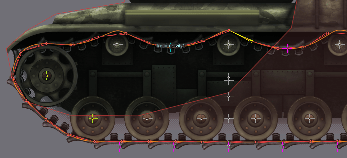
Some parts of each tread are drawn in front of the wheels, while other parts of the same tread are drawn behind the wheels. The slot and attachment setup for a single tread looks like this:
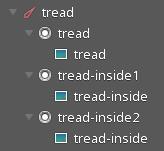
The tread slot is drawn in front of the wheels, while the slots tread-inside1 and tread-inside2 are drawn behind the wheels. This is defined by the position of all involved slots in the Draw Order of the skeleton.
Animation
When playing the drive animation in Animate mode, we can see the treads moving with the rotation of the wheels. This was achieved by keying the Position property of the path constraint as can be seen in the dopesheet:
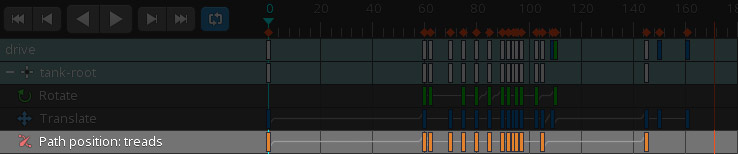
When the tank drives over the rock, the treads chain deforms, naturally following the rock's shape. This was done by keying the transforms of the bones to which the path is weighted:

Wheels
The top part of a wheel's rim casts a shadow on the upper inside of the wheel. To achieve this effect even while the wheel is rotating, the shadow part is separated from the actual wheel. This is the setup of one of the wheels:
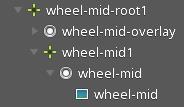
The wheel-mid-root1 contains the slot wheel-mid-overlay, which contains an attachment representing the shadow part of the wheel. The slot's Blending Mode is set to Multiply to achieve the desired shadow effect when it is drawn atop the actual wheel.
The actual wheel is contained in the wheel-mid1 bone, a child of the wheel-mid-root1 bone. The wheel-mid-root1 bone is only translated, keeping the shadow unrotated. To rotate the wheel, the wheel-mid1 bone is rotated.
Selecting the wheel-mid1 bone and rotating it will cause the rest of the bottom wheels to rotate as well. This is achieved via a transform constraint:
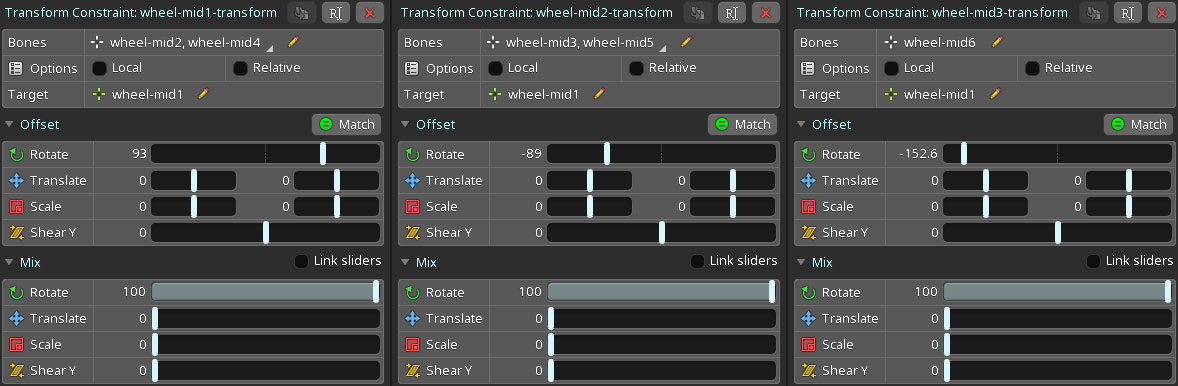
The transform constraint wheel-mid1-transform rotates the bones wheel-mid2 and wheel-mid4, based on the rotation of the wheel-mid1 bone. This way, we only need to key the rotation of the wheel-mid1 bone, while the transform constraint ensures the other bones follow suite.
To make the wheel rotation look less uniform, we set the transform constraint's Rotate offset to 93. Since the other wheels should rotate with the same speed as wheel-mid1, the Rotate mix is set to 100.
This transform constraint could drive the other wheels as well. However, this would lead to a uniform look where all the wheels rotated identically. Instead, we setup a few more transform constraints with different rotation offsets, as can be seen in the transform constraints wheel-mid2-transform and wheel-mid3-transform.
The other two sets of wheels, wheel-small-* and wheel-big-*, have a similar setup, taking into account that smaller wheels need to rotate faster than bigger ones.
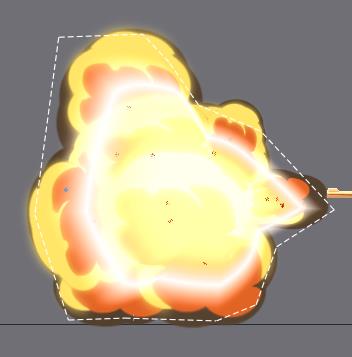
Explosion effect
Included with the tank project is an animation called shoot:
Creating an effect like this with traditional frame-by-frame animation would take up a large amount of texture memory, which is prohibitive, especially for mobile games. Instead of using multiple large images to represent each full frame of the explosion, we use five small images named smoke-puff01-bg, smoke-puff01-fg, smoke-puff02-fg, smoke-puff03-fg, and smoke-puff04-fg which are duplicated onto many different smoke* bones.
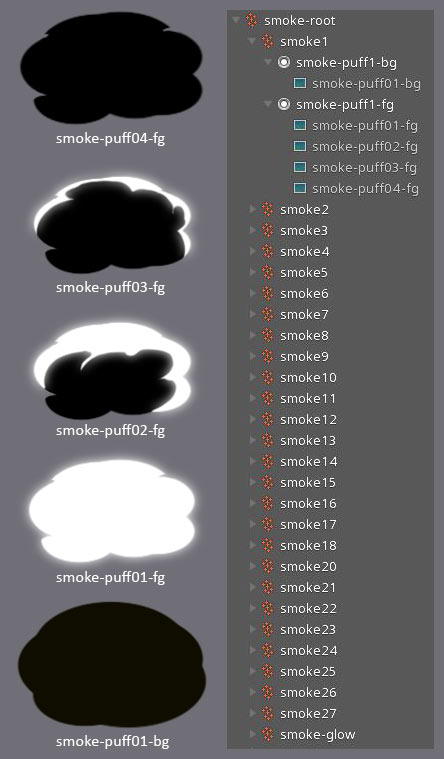
Note that these images are grayscale to enable the use of Spine's tint black feature. Below you see the change in slot visibility and color for the smoke-puff1-fg slot while scrubbing the shoot animation in the dopesheet.
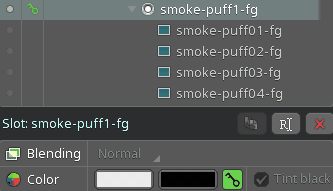
The shape of the smoke puff is changed by keying the visibility of the differently shaped attachments, which is essentially mixing in traditional frame-by-frame animation. Tint black is used to change the color of the puff.
Slowly scrubbing the timeline in the dopesheet reveals more and more smoke puffs. Their setup is similar to the one used for smoke-puff1-fg, with variations in translation, rotation, scale, and timing to create a convincing explosion effect.
The smoke-glow bone has a mesh attachment and a slot with Blending set to Additive to give the explosion effect a little more intensity and helps brighten up the hottest parts of the cloud.